DragonFly BSD 2.2における日本語環境の構築
今回は前回に引き続き、 HAMMERファイルシステムの搭載などで注目を集めるDragonFly BSD 2.2を取り上げる。DragonFly BSDをデスクトップOSとして使用するというケースはあまりないかもしれないが、少なくとも、ターミナル上で日本語の文書の閲覧、日本語入力をできるようにしておくと便利だろう。今回はパッケージシステム「pkgsrc」による、基本的な日本語環境の構築方法を紹介しよう。ロケールは「ja_JP.UTF-8」とし、ターミナルエミュレータにはmlterm、日本語入力システムとしては「um + anthy」を使用するものとする。
pkgsrcのセットアップ
前回説明したように、DragonFly BSDはFreeBSDから派生したが、パッケージ管理システムとしてNetBSDから移植されたpkgsrcを採用している。そこでまずは、次のようにしてNetBSDの匿名CVSサーバからpkgsrcのパッケージ・コレクションを取得する。
# cd /usr
# cvs -d anoncvs@anoncvs.us.netbsd.org:/cvsroot co pkgsrc
これで、/usr/pkgsrcの下にカテゴリごとのディレクトリが作成される。
# ls /usr/pkgsrc/
CVS		converters	fonts		misc		security
INDEX		corba		games		mk		shells
Makefile	cross		geography	multimedia	sysutils
README		crosspkgtools	graphics	net		templates
archivers	crypto		ham		news		textproc
athena		databases	inputmethod	packages	time
audio		devel		japanese	parallel	wm
benchmarks	distfiles	lang		pkg_summary	www
biology		doc		licenses	pkglocate	x11
bootstrap	editors		mail		pkgtools
cad		emulators	math		plan9
chat		filesystems	mbone		print
comms		finance		meta-pkgs	regress
目的のパッケージを見つけるには、/usr/pkgsrcディレクトリで「bmake search key=”キーワード”」を実行するとよい。
# cd /usr/pkgsrc/
# bmake search key="anthy"	←「anthy」をキーワードにパッケージを検索
Pkg:    anthy-9100
Path:   inputmethod/anthy
Info:   Kana Kanji conversion system
Maint:  taya@NetBSD.org
Index:  inputmethod
B-deps: libtool-base>=1.5.22nb1 gmake>=3.81 gettext-lib>=0.14.5 {gettext-tools>=0.14.5,gettext>=0.10.36<0.14.5}
R-deps:
Arch:   any
…以下略…
パッケージコレクションを取得したら、インストールは目的のパッケージのディレクトリに移動し「bmake install clean」コマンドを実行すればよい。ソースの取得からコンパイル、インストールまでの流れが自動で行える。このとき、パッケージ生成時のオプションは「/usr/pkg/etc/mk.conf」で設定する(「/etc/mk.conf」は参照されない)。なお、makeコマンドにはBSD系のbmakeコマンドを使用する点に注意されたい。また、pkgsrcでインストールしたソフトウェアは、「/usr/pkg」ディレクトリ以下に展開される。
ロケールの設定
それでは日本語環境の構築に取りかかろう。まずは、シェルの環境設定ファイルでロケールを「ja_JP.UTF-8」に設定する。
●Cシェル系の場合「~/.cshrc」
setenv LANG "ja_JP.UTF-8"
●bashの場合「~/.bashrc」
export LANG="ja_JP.UTF-8"
日本語フォントのインストール
なにはともあれ、kappa20、naga10といった日本語フォントを含むパッケージ「jisx0208fonts」をインストールする。このとき、ライセンス上の制約から、「/usr/pkg/etc/mk.conf」に次のような設定行を加える必要がある。
ACCEPTABLE_LICENSES+=no-commercial-use
設定を変更したら、次のようにインストールする。
# cd /usr/pkgsrc/fonts/jisx0208fonts/
# bmake install clean
同様に、多国語フォントのパッケージ「intlfonts」もインストールしておくとよいだろう。
# cd /usr/pkgsrc/fonts/intlfonts/
# bmake install clean
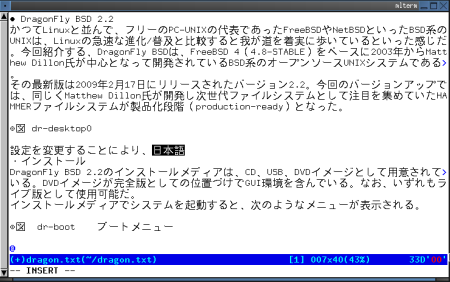
以上で、デフォルトでインストールされている端末「urxvt」などで日本語が表示できるようになる(図1)。
uim-anthyのインストール
続いて、日本語入力システム「uim」、およびかな漢字変換エンジン「anthy」をインストールする。まずは、uimディレクトリに移動する。
# cd /usr/pkgsrc/inputmethod/uim
ここで「bmake show-options」コマンドを実行すれば、uimに現在設定されているオプションが確認できる。
# bmake show-options
Any of the following general options may be selected:  ←利用可能なオプション
	anthy	 Use Anthy as Japanese conversion program.
	canna	 Use Canna as Japanese conversion program.
	eb	 Enable EB dictionary library support.
	gnome	 Enable GNOME support.
	gtk	 Enable support for GTK.
	kde	 Enable KDE support.
	m17nlib	 Enable the m17n library support.
	prime	 Use Prime for Kana-to-Kanji conversion.
	qt	 Enable support for QT.
	uim-fep	 Enable UIM FEP support.
	xim	 Enable X Input Method support.

These options are enabled by default:  ←デフォルトで有効なオプション
	anthy canna gtk uim-fep xim

These options are currently enabled:
	anthy canna gtk uim-fep xim

You can select which build options to use by setting PKG_DEFAULT_OPTIONS
or PKG_OPTIONS.uim.
結果を見るとわかるように、オプションとして「anthy」が有効になっているため、デフォルトの設定ままインストールすればよい。
# bmake install clean
これでuimとanthyが一緒にインストールされる。
mltermのインストール
最後は、多言語対応ターミナルエミュレータ、mltermのインストールだ。「bmake show-options」でオプションを確認してみると「uim」が有効になっていない。
# cd /usr/pkgsrc/x11/mlterm/
# bmake show-options
Any of the following general options may be selected:
	uim	 Enable UIM support.
	xft2	 Enable Xft support.

These options are enabled by default:  ←デフォルトで有効なオプションは無し

These options are currently enabled:

You can select which build options to use by setting PKG_DEFAULT_OPTIONS
or PKG_OPTIONS.mlterm.
そこで「/usr/pkg/etc/mk.conf」に次の設定行を加える。
PKG_OPTIONS.mlterm = uim
後はこれまでと同じく、次のようにしてインストールを行えばよい。
# cd /usr/pkgsrc/x11/mlterm/
# bmake install cleam
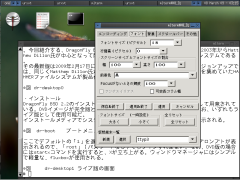
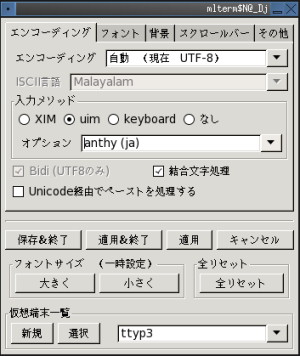
mltermの設定は、「Ctrl + 右クリック」で表示されるダイアログボックスで行うのが手軽だ(図2)。今回の環境で日本語入力を行うには、少なくとも、「エンコーディング」パネルで「入力メソッド」を「uim」に、「オプション」を「anthy(ja)」に設定する必要がある。
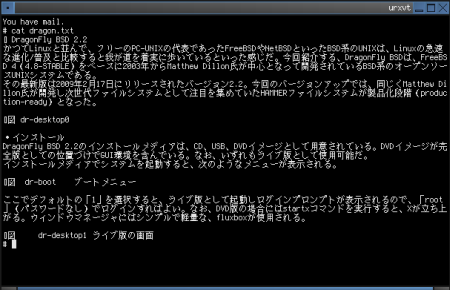
以上で、「半角/全角」キーや「Shift + スペース」で日本語入力のオン/オフが行えるようになる。標準でインストールされているVimを使えば、さまざまな文字コードの日本語のファイルが編集可能だ(図3)。
あとは、必要に応じて多言語対応のページャ「lv」や、文字コード変換プログラム「nkf」といった定番ツールをインストールして環境を整えていけばよいだろう。